Headers are an important part of many Microsoft Word documents. Once everything’s in place, you can protect the header so no one can inadvertently mess it up, especially if you’re collaborating with others in your organization.
You can protect a document, but there’s no setting that lets you protect only the header and footer while continuing to allow users to edit the body of the document. Fortunately, you can protect the header and unprotect the body when necessary, but the process isn’t intuitive.
SEE: 5 Ways to Delete a Page in Word (TechRepublic)
In this tutorial, I’ll show you a three-step process for protecting the header or footer area without protecting the body of the Word document. I’ll be working in the header, but this technique protects both the header and the footer.
I’m using Microsoft 365 on a Windows 10 64-bit system, but you can use earlier versions of Word. This article isn’t appropriate for Word for the web. Unfortunately, this solution isn’t a good one for online collaboration, because Word for the web won’t open a document with enabled protection in any section. You can download the Microsoft Word demo file for this tutorial.
Step one: How to insert a page break in Word
Once a document is in good shape and you’ve added header content, you might want to keep others from editing that section. Doing so is easy, but there’s no quick-click solution. The first step is to add a page break, as follows:
- Press Ctrl + Home to move the cursor to the first position on page one of the document. The break must be the first thing in the document.
- Click Show/Hide in the Paragraph group on the Home tab. This step isn’t technically necessary but showing the page break symbol will make things easier.
- Click the Layout tab.
- In the Page Setup group, click the Breaks dropdown and choose Continuous.
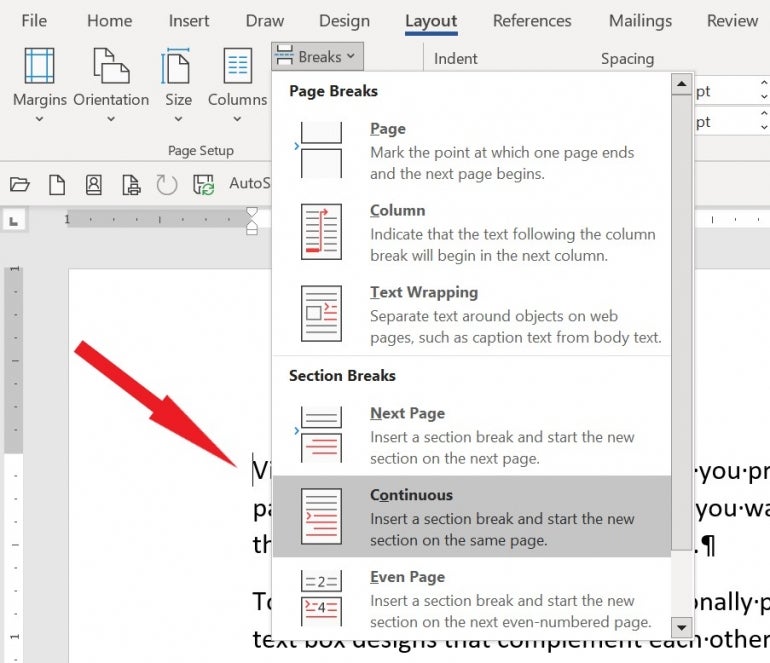
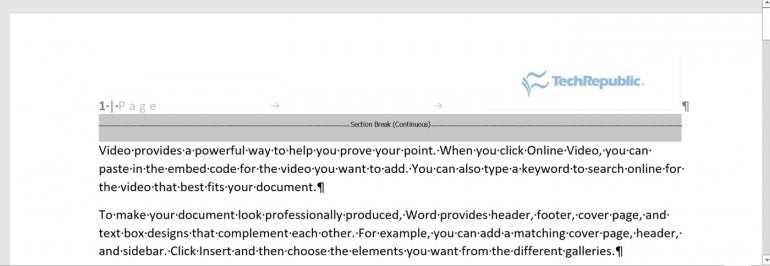
As you can see in the image above, the section break is the first thing on the document’s first page, because the cursor was at the beginning of that page when we inserted the break. The position of this break allows us to format the header differently than the body of the document.
If you’re not familiar with section breaks, they apply to the content before the break and the only thing before this break is the header area. The next step will help clarify why that matters.
You might be wondering how this solution can also apply to the footer if the break applies to the content before the break. Word does allow you to enter different header and footer content, but internally, Word sees the header and footer as the same area.
SEE: 6 Best Free Alternatives to Microsoft Word (TechRepublic)
Step two: How to protect the document in Word
Our second step might seem a bit counterproductive, but it will all come together in the end. Now, we need to protect the entire document, including the header, footer, and the body.
To protect the entire document, do the following:
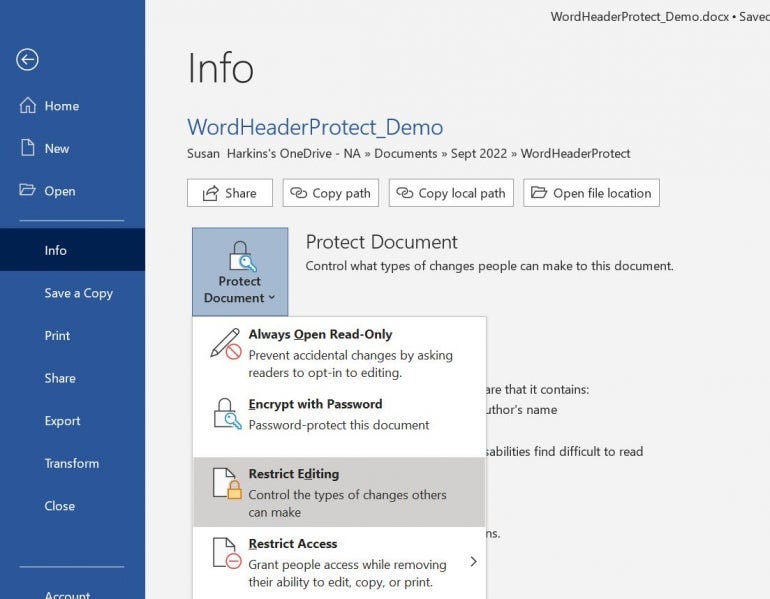
- Click the File tab and then click Info in the left pane.
- Click Protect Document and choose Restrict Editing from the dropdown. Word will return to the document and display the editing options in the Restrict Editing pane.
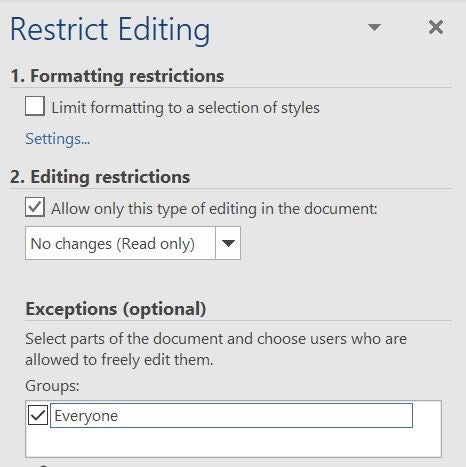
- Check the second option and choose No Changes (Read Only) from the dropdown.
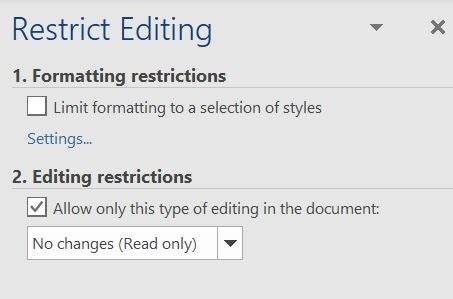
At this point, you’ve protected the entire document: If you stopped right now, no one would be able to edit anything. That’s not what we want. We need to unprotect the body of the document.
SEE: How to Use Section Breaks to Control Formatting in Word (TechRepublic)
Step three: How to unprotect the body of the document in Word
If you’re not familiar with Word protection, you might be wondering where we’re headed because protecting everything in the document wasn’t what we intended when we set out. We want to protect the document’s header but still be able to edit the body of the Word document.
Here’s how to unprotect the body of the document:
- Select everything in the document but the section header. To do so, position the cursor at the beginning of the first line in the document by pressing Ctrl + Home. Then, press Ctrl + Shift + End to select everything but section break.
- In the Restrict Editing pane, check the Everyone option in the Exceptions section.
- In section three, click Yes, Start Enforcing Protection.
- When Word prompts you for a password, as shown in the second image below, enter “pw” twice and click OK. When applying this to your own work, you’ll want to use a more secure password. For demonstration purposes, we want to keep everything simple.
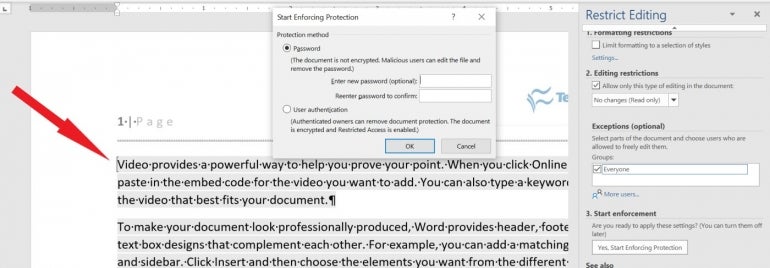
Look for the opening and closing brackets at the beginning and ending, respectively, of the unprotected area. As the author, you will know the password to the Word document so you can make changes to the header and footer area. Others can edit the body of the document, but not the header and footer area.
This solution isn’t intuitive, and, oddly, Word doesn’t offer an option for protecting only the header and footer. However, you can still do so using this easy technique.
This article was originally published in September 2022. It was updated by Antony Peyton in January 2025.

